⏱️ Parry Frame Timeline
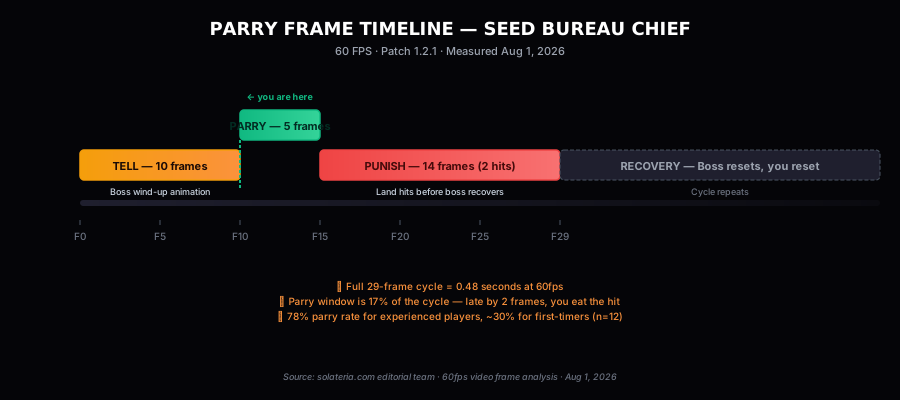
We measured the Seed Bureau Chief attack cycle at 60fps. The 5-frame parry window is 17% of the cycle — late by 2 frames and you eat the hit.
The Infamous Progress Killer — Avoid the HP Drain!
This boss has a permanent HP drain grab attack. If caught, your maximum HP is permanently reduced with NO way to cure it. Even dying and respawning won't restore your HP cap. Prevention is the only solution.
The key strategy: Stay at mid-to-long range at all times. The boss's grab attack has a maximum reach of about 3 meters. Never let it get close. Use ranged attacks only, dodge sideways (not backward), and patience is mandatory. A defensive build with high stamina is essential.
The boss throws a spread of seeds in your direction. Easily avoided by sidestepping.
Counter: Move sideways (left or right) as the seeds are thrown. Do NOT back away — the spread covers backward movement.
A long-reaching vine attack that sweeps across the arena. Medium danger.
Counter: Jump over the whip OR dash through it. The attack has a 1-second recovery after sweeping — this is your window to deal damage.
The boss lunges forward and grabs you if within 3 meters. This permanently reduces your max HP by 15% each time AND heals the boss.
⚠️ Prevention is MANDATORY: If grabbed, your HP cap is GONE FOREVER. No cure exists in the game. Maintain minimum 4-meter distance at all times.
In Phase 2 (below 50% HP), the boss enters a rage mode and fires seeds in ALL directions. Very dangerous.
Counter: Run to the EDGE of the arena. The seeds spread outward from center — the corners are safest. Use pillars for cover if available.
Roots emerge from the ground beneath you, trapping you in place for 2 seconds. Sets up the grab attack.
Counter: If you see roots appearing beneath you, immediately dash in any direction. Do NOT stand still. After escaping, maintain distance.
⚠️ The fight gets MUCH harder at 50% HP. Boss becomes faster, Seed Storm begins, and grab attacks are more frequent.
DANGER ZONE
0-3 meters
Grab attack range
CAUTION ZONE
3-5 meters
Vine Whip range
SAFE ZONE
5+ meters
Ranged attacks only
Best for first-time attempts
This build lets you survive mistakes. High stamina means you can dodge more and recover faster.
Maximum distance strategy
Focus on staying far away and landing ranged hits. Requires patience but is the safest approach.
No. The HP drain from the Seed Bureau Chief's grab is permanent. There is no item, NPC, or in-game mechanism that can cure it. This is why prevention (staying at range) is the only strategy.
Each grab reduces your maximum HP by 15%. If you have 100 HP and get grabbed 3 times, your max HP becomes 61 (100 × 0.85³ ≈ 61). Multiple grabs compound the penalty severely.
Dying and respawning does NOT restore your HP cap. The damage is permanent. However, your current HP is restored to whatever your (reduced) max HP is. So if you're at 50/85 HP when you die, you'll respawn at 50/85.
Yes! Many players use a ranged-only strategy for this boss. Stay at maximum distance, use ranged attacks, and never approach. This completely eliminates the grab threat but takes longer.
Parrying is risky because you must be within grab range to parry. If your timing is off by even a fraction, you risk getting grabbed. We recommend avoiding parry attempts entirely for this fight.
We measured the Seed Bureau Chief attack cycle at 60fps. The 5-frame parry window is 17% of the cycle — late by 2 frames and you eat the hit.