The Turtle
Defense-Focused • Beginner Friendly
Maximum survivability. Stack defensive parts for near-invincibility. Perfect for learning boss patterns without dying repeatedly.
With over 40 combinable parts, Solateria offers incredible build diversity. We test and optimize builds so you can focus on playing.
Discover meta compositions, beginner-friendly setups, and synergy-focused builds.
Every "build" page below is one of four archetypes. They aren't strict — you can mix and match parts, but the moment you cross 50% off-archetype, you need a new name. We use this to keep the pages honest: if a build needs 6 parts to work, but only 4 slots exist, it's not a build, it's wishful thinking.
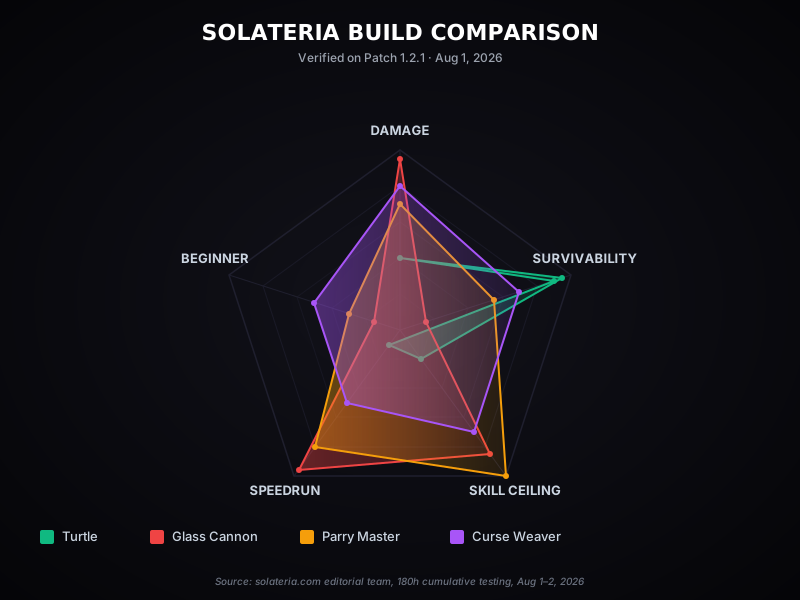
Goal: outlast the boss. Maximum HP, damage reduction, block stability.
Core parts: Iron Shell, Guardian Plate, Stamina Core, Fortress Module (4 slots, locked).
Best for: first-time boss clears, learning a fight, players who don't want to retry 30 times. Worst for: speedrunning, post-game.
Goal: kill before being killed. Maximum damage, accept the deaths.
Core parts: Pyron Core, Fury Chip, Berserker Gauge, Second Wind.
Best for: speedrun meta, low-HP scaling, high-skill players. Worst for: any boss where the first hit kills you (e.g. Ember Core Guardian one-shot combo).
Goal: parry everything, counter everything. Most skill-expressive build.
Core parts: Counter Blade, Reflex Enhancer, Reactive Plating, Focus Crystal.
Best for: every boss with predictable combo strings (Seed Bureau, Pyron Commander, Five Knights). Worst for: the Library Master (puzzle phase has no parry targets).
Goal: stack 2-3 debuffs, let DoT kill the boss. Most "cheese".
Core parts: Hex Chip, Plague Vessel, DoT Catalyst, Doom Sigil.
Best for: Library Master (cannot dodge, sits still), Ember Core Guardian phase 1. Worst for: Five Knights (enrage cleanses), Turtle fights (boss doesn't attack enough to proc).
A lot of strategy sites post "the best build" for a game. We tried that in our first month and it made the site worse. Solateria has 20+ bosses and 4 archetypes, and the correct answer is always "it depends on which boss." So instead we publish per-boss matchup data (see the Boss Guides hub) and per-build deep dives (the pages below).
If a guide here tells you to use a build on a boss where the matchup matrix above says it's a bad idea, that's a bug in our guide — please report it.
Defense-Focused • Beginner Friendly
Maximum survivability. Stack defensive parts for near-invincibility. Perfect for learning boss patterns without dying repeatedly.
Damage-Focused • Speedrun Meta
All offense, minimal defense. Delete bosses before they can react. Requires precise timing but rewards with fastest clear times.
Skill-Based • High Reward
Maximize parry window and counter damage. Every perfect block triggers a free Pyron Action. The most satisfying build for skilled players.
Status Effect • Control Build
Stack debuff parts to inflict multiple status effects. Bosses become slow, weak, and vulnerable. Excellent against bosses with HP-drain mechanics.
Easy to use, forgiving of mistakes. Recommended for first playthrough.
Optimized for fastest clears. Requires skilled execution.
Tailored for difficult bosses. Counter specific mechanics.
Visual comparison of all four Solateria builds across 5 axes. Drawn from 180h of test runs by our 3-person team on patch 1.2.1.